| Ferrari F430 Oil Change How-To |
|
Hello Ferrari Fans! We are back in this New Year of 2011 with major updates for our website, dedicated to those who just can't get their hands off their cars! This following How-To is the next installment of our Ferrari How-To's, after the long-awaiting update!
This next Ferrari How-To is also dedicated to all the F430 chassis vehicles. This time, we are going for one of the most basic, simple yet most essential maintenance step: Oil Change! I'm sure we all know that a regular oil change will ensure the longevity of the engine and drivetrain's performance in any vehicle.
Ferrari has always been known for its naturally high-revving motors, and therefore a proper and regular maintenance for these cars is extremely crucial - especially for those individuals who have a habit of pushing their cars to the limit on a regular basis! In this How-To, we will show you how to do a proper oil change on a Ferrari F430.
Before we start, make sure you have all the tools and parts necessary for this task; and most importantly, the OIL itself! Ferrari recommends Shell Helix Ultra 5W-40 oil, and you will need 10 litres of it!
Here are some other parts and tools that you will be needing for this job:
Parts:
- Oil Filter (Ferrari recommends PURFLUX LS 538 oil filter)
- O-Ring for flange cap underneath the gearbox housing (Optional)
- O-Ring for filter screen inside the gearbox housing (Optional)
Tools:
- Jack and Jackstands (if you do not have access to a hoist)
- Metric Hex Keys
- Flathead Screwdriver
Let's get started!
|
 |
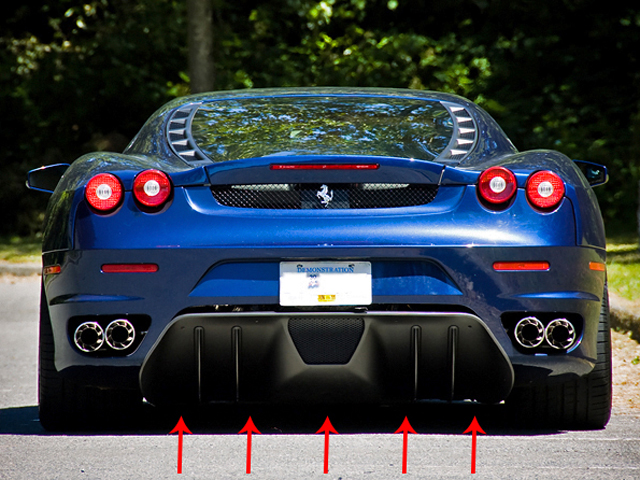 |
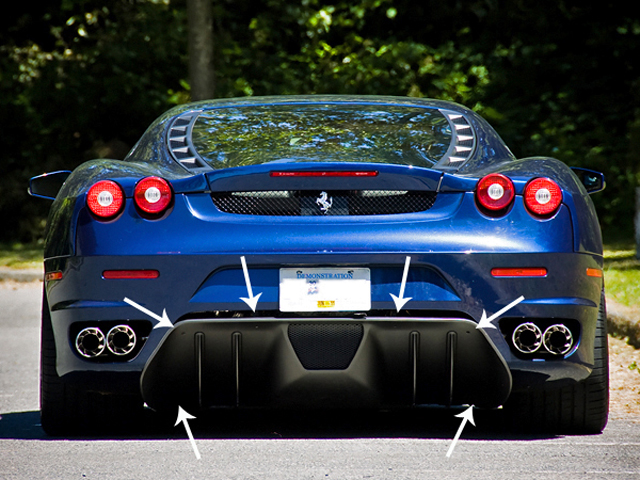
The first step is to remove the rear diffuser. The rear diffuser is held by a total of 11 screws. The first 6 screws are hex screws, located on the top part of diffuser (Pic 1, indicated by white arrows), while the other 5 screws are 10mm screws, located on the bottom part of the diffuser (Pic 2, indicated by red arrows). Once all 11 screws are off, the rear diffuser can then be dismounted off the car. |
 |
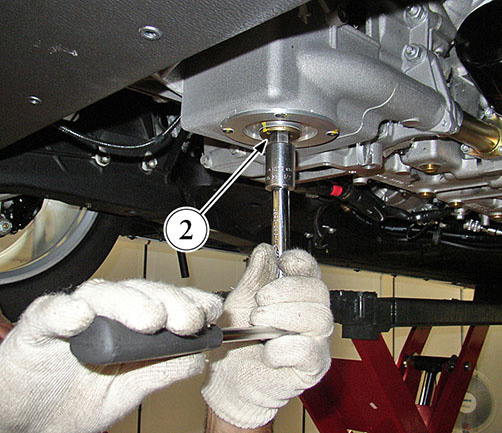 |
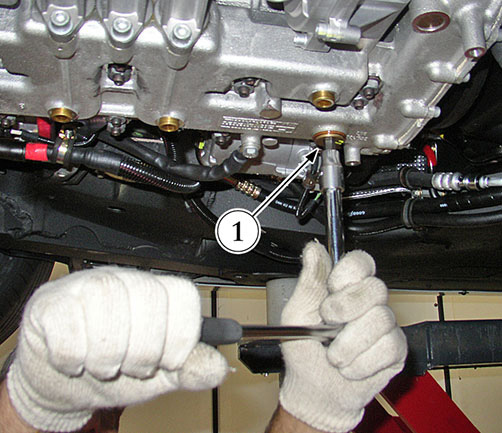
Once the rear diffuser is dismounted, you will be able to access the bolts underneath the engine and gearbox. The next step would be to open the drain bolt on the engine sump (1) , as well as the drain bolt underneath the gearbox housing (2). Allow the oil to drain out completely, and make sure that you dispose the used oil properly! |
 |
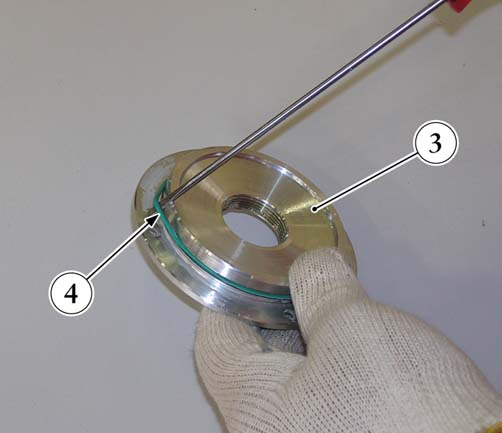 |
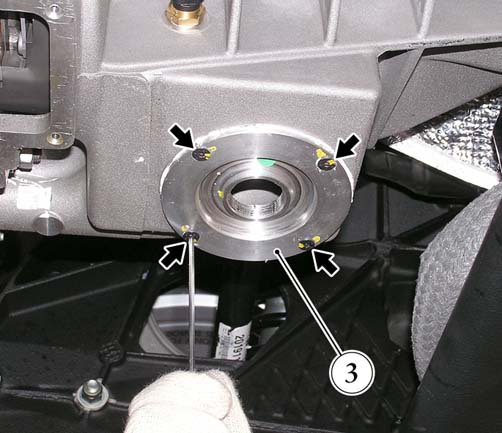
The next step would be to clean the filter screen, located inside the gearbox housing, under the drain bolt support flange (2) removed earlier. Undo the four hex screws fastening the flange (3) to the gearbox housing. Then, using a flathead screwdriver for leverage, or an extracting tool fastened to the plug seat (2), remove the flange, complete with the O-Ring (4). Check the condition of the O-Ring (4), and replace it if necessary! |
 |
 |
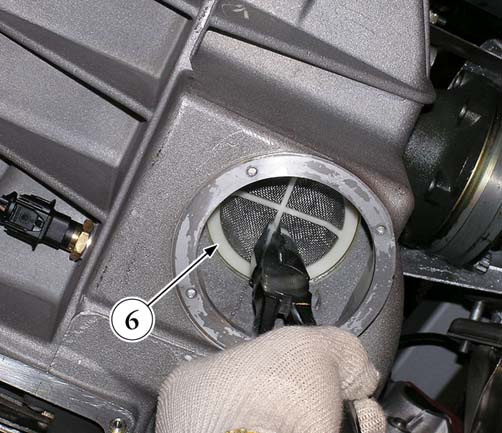
After you remove the flange (3), remove the stop ring (5) from inside the gearbox housing by levering it out of its seat with a screwdriver. After that, simply remove the filter screen (6) by pulling it out of the gearbox housing using a set of pliers. |
 |
 |
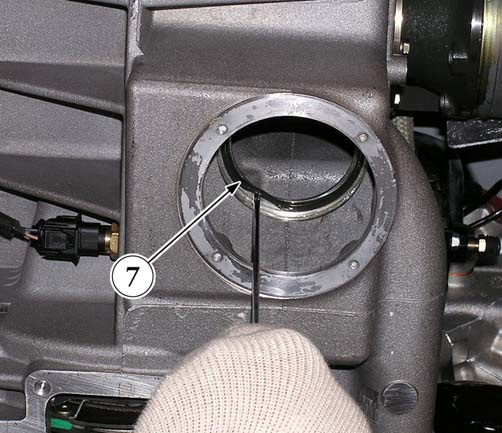
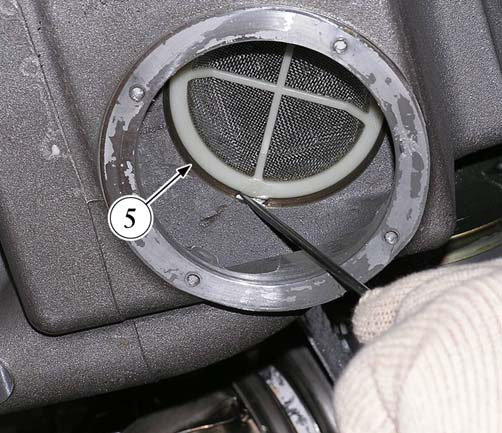
Once the filter screen (6) is out, remove the O-Ring (7) from inside the gearbox housing. If it is damaged, it will have to be replaced! The last step before putting everything back together would be to clean the filter screen by dipping it in a degreasing solution, then drying it with compressed air. Take care not to damage the mesh! If any tears are found in the filtering element, the filter must be replaced. Once that's done, lubricate the O-Rings (4) and (7) to faciliate their fitting, then proceed by re-fitting the filter screen (6). |
 |
 |
After the filter screen is properly placed, lock it in place on the gearbox housing with the stop ring (5). After that's done, mount the flange (3) on the gearbox housing, and align the holes on the flange with those on the housing by using a screwdriver. Once everything lines up, rest the flange on the gearbox housing, and lock the fastening screws to the torque prescribed.
|
 |
|
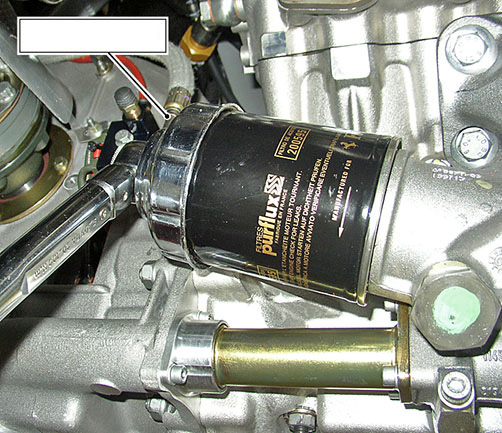
Last but not least, the oil filter itself! The oil filter on the Ferrari F430 is located at the rear end of the pump unit, on the right-hand side of the engine. Simply unscrew it from its seat! Next, grab the new oil filter that you've purchased, lubricate the rubber gasket with engine oil, and re-fit the new oil filter on where the old one was. Tighten it to the prescribed torque! |
|
|
Once the oil filter is properly tightened, it's almost time to wrap things up for this job. Carefully clean the drain bolt for both the engine sump (1) and the drain bolt underneath the gearbox housing (2), and replace the gaskets. You can then re-assemble them and tighten them to the prescribed torque! |
 |
 |
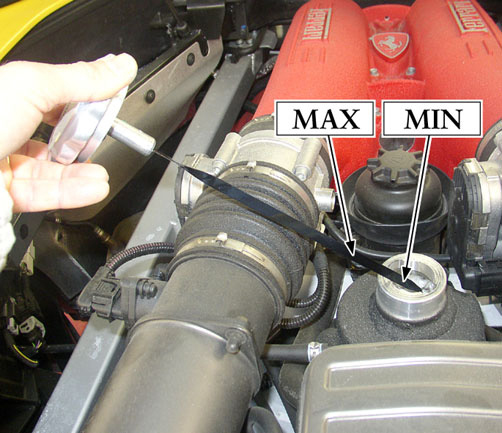
Proceed with refilling, using both the type and quantity of oil mentioned above. After refilling, restart the engine and let it warm up. Run the engine until it reaches a temperature of 80-90 °C. while the engine is idling, unscrew the oil separator cap found on the gearbox housing and check the oil level. The oil level should be between the "MIN" and "MAX" notches marked on the oil dipstick. If needed, proceed by topping up the oil. Lastly, tighten the oil separator cap, and make sure that there is no leakage from the drain bolt (1) and (2), as well as from the oil filter. Once the oil is topped up, and there is no leakage found anywhere, you are officialy DONE! Good Luck, and ENJOY! |
|

